RECOMMENDATIONS FOR USE:
All assembly or disassembly of the LYV AUTO product must be carried out by a professional and/ or person trained for this type of intervention, this with the specific tools recommended by the manufacturer.
LYV AUTO cannot be held responsible for any faults resulting from non-conforming manufacturer’s assembly recommendations. Obtaining the manufacturer’s recommendations is the responsibility of customer.
(FAILURE TO FOLLOW THESE RECOMMENDATIONS MAY RESULT IN DAMAGE TO THE PRODUCT.)
YOU SHOULD NOT:
– Use the steering after a fall or an impact.
– Hit the outer ball joint stud before the assembly operation on the knuckle holder.
– Scratch the paintwork (rust protection).
– Unstick, mark or cover the traceability label.
– Use the input shaft, bellows, connecting rods and firewall seal to handle the steering.
– Use the electric motor, the harnesses and the connection box to handle the steering.
– Mechanically strain the harness cables.
– Pull on the cables to disconnect the harness. Instead, pull the harness connectors while releasing the lock.
– Place the steering on the bellows and electric harnesses.
– Exceed a rotation torque > 100 N.m on the input shaft.
– Exceed an axial strain on the input shaft > 1000 N.
– Force on the connecting rods when positioning against the stops.
– Modify the push screw adjustment, remove or swap components.
– Expose the steering to magnetic fields > 1 mT (distance < 50 mm).
– Expose the steering to – electrostatic discharges greater than 2000 Volts (distance < 20 cm) when running or stopped.
– Expose the steering to electric conductors > 10 A (A single contact with the column can damage it).
YOU SHOULD:
– Because the steering is a precision instrument, you should handle it with care.
– Only supply the steering using a LYV AUTO calculator referenced for the vehicle (for non-built-in calculators).
– Handle the harness and electric connectors in a zone protected from electrostatic charges when removing the protective bag and/or the connector protection.
– After the parallelism adjustment, check that the bellows are not twisted and hold the outer ball joint body with a wrench to tighten the axial ball nut.
– Use the tie rod fixtures to the cradle to handle the steering.
CLEANLINESS:
– Special care to cleanliness must be taken when working on the steering. Avoid exposing the connectors to pollution.
TIGHTENING TORQUES
– FAILING TO COMPLY WITH MANUFACTURER RECOMMENDED TIGHTENING TORQUES MAY RESULT IN ACCIDENTS.
– SYSTEMATICALLY FIT NEW FASTENERS.
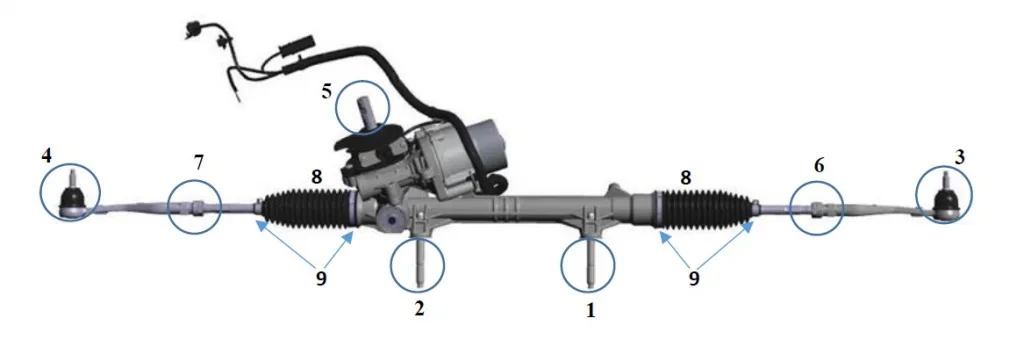
| Instructions | Recmmendations |
|---|---|
| Steering tightening on the cradle (1 and 2) | See manufacturer recommendations |
| Pivot tightening onto the spindle holder (3 and 4) | same as above |
| Column tightening on the input shaft (5) | same as above |
| Connecting rod nut tightening (6 and 7) after adjusting parallelism | same as above |
| Thermal shield fixing | same as above |
| Inner ball joint tightening on rack bar if delivered separately (8) | same as above |
| Bellow fixing on steering if delivered separately (9) | same as above |
| Stud tightening on steering gear if delivered unassembled (1 and 2) | 7Nm min to 9 Nm max |