RECOMMENDATIONS FOR USE:
All assembly or disassembly of the LYV AUTO product must be carried out by a professional and/ or person trained for this type of intervention, this with the specific tools recommended by the manufacturer.
LYV AUTO cannot be held responsible for any faults resulting from non-conforming manufacturer’s assembly recommendations. Obtaining the manufacturer’s recommendations is the responsibility of customer
(FAILURE TO FOLLOW THESE RECOMMENDATIONS MAY RESULT IN DAMAGE TO THE PRODUCT.)
YOU SHOULD NOT:
– Use the steering after a fall or an impact.
– Hit the outer ball joint stud before the assembly operation on the knuckle holder.
– Force on the connecting rods if positioning against the stops.
– Scratch the paintwork (rust protection).
– Unstick, mark or cover the traceability label.
– Use the input shaft, bellows, connecting rods, firewall seal or rigid hydraulic pipes to handle the steering.
– Modify the push screw adjustment, remove or swap components.
– Place the steering on the bellows or rigid hydraulic pipes.
YOU SHOULD:
– Because the steering is a precision instrument, you should handle it with care.
– After the parallelism adjustment, check that the bellows are not twisted and hold the outer ball joint boby with a wrench to tighten the axial ball nut.
– Use the tie-rod fixtures to the cradle to handle the steering.
CLEANLINESS:
– Special care to cleanliness must be taken when working on the steering.
– Any pollution in the hydraulic circuit and/or damage to the high and low pressure interfaces can result in a leak.
TIGHTENING TORQUES
– FAILING TO COMPLY WITH MANUFACTURER RECOMMENDED TIGHTENING TORQUES MAY RESULT IN ACCIDENTS.
– SYSTEMATICALLY FIT NEW FASTENERS.
| Instructions | Recmmendations |
|---|---|
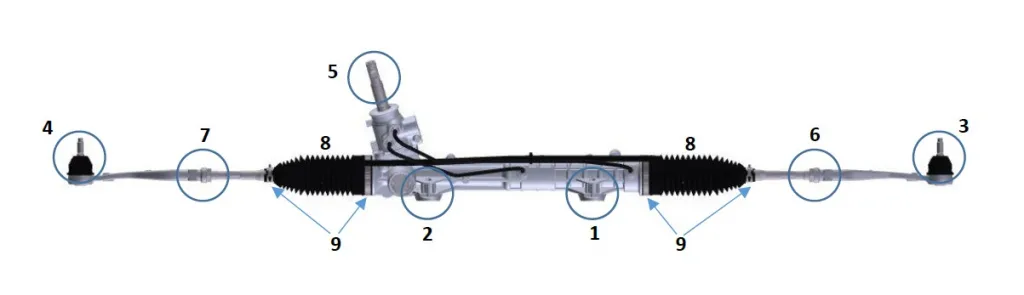
| Steering tightening on the cradle (1 and 2) | See manufacturer recommendations |
| Pivot tightening onto the spindle holder (3 and 4) | same as above |
| Column tightening on the input shaft (5) | same as above |
| Connecting rod nut tightening (6 and 7) after adjusting parallelism | same as above |
| High and low pressure hoses fixing on steering | same as above |
| Inner ball joint tightening on rack bar if delivered separately (8) | same as above |
| Bellow fixing on steering if delivered separately (9) | same as above |
| Stud tightening on steering gear if delivered unassembled (1 and 2) | 7Nm min to 9 Nm max |
FILLING OIL:
USE THE RECOMMENDED OIL TO AVOID DAMAGING THE STEERING. (See manufacturer recommendations.)
FILLING THE SYSTEM
FAILING TO FOLLOW THE INSTRUCTIONS CAN RESULT IN NOISINESS OR HANDLING DIFFICULTIES OR DAMAGE TO THE HYDRAULIC CIRCUIT.
- Fill the tank with new oil up to the top mark.
- Raise the vehicle so that the front wheels are no longer on the ground.
- With the engine stopped, slowly rotate the wheel from stop to stop twice in order to fill the steering.
- Top up the tank to the top mark.
- Start the engine and make sure the tank is still full of oil so as not to take in air.
- Turn the wheel from stop to stop about a dozen times.
- Repeat the procedure until there are no more air bubbles in the tank.
- Fill the tank with new oil up to the top mark.
- Lower the vehicle to the ground and carry out 2 parking maneuvers to check the system is in working order.